Why Use a Person When There’s an App?

Why Use a Person When There’s an App?

Really, why have a real, living, breathing person edit your photos when there are SO MANY apps available? A quick search for “photo editor” on the Play Store reveals dozens and dozens of apps able to lighten and brighten colors, crop, remove people, and more.

Let me show you the difference between what a computer photo editor and a human photo editor and do using a few versions of the same picture! My brother and his girlfriend were in Hawaii loving life and taking amazing pictures, but unfortunately for their photos, so were plenty of other people. He edited a few of his photos in an app on his phone, but was very happy to see just how much more professional I could make them. . . Keep scrolling to check it out!

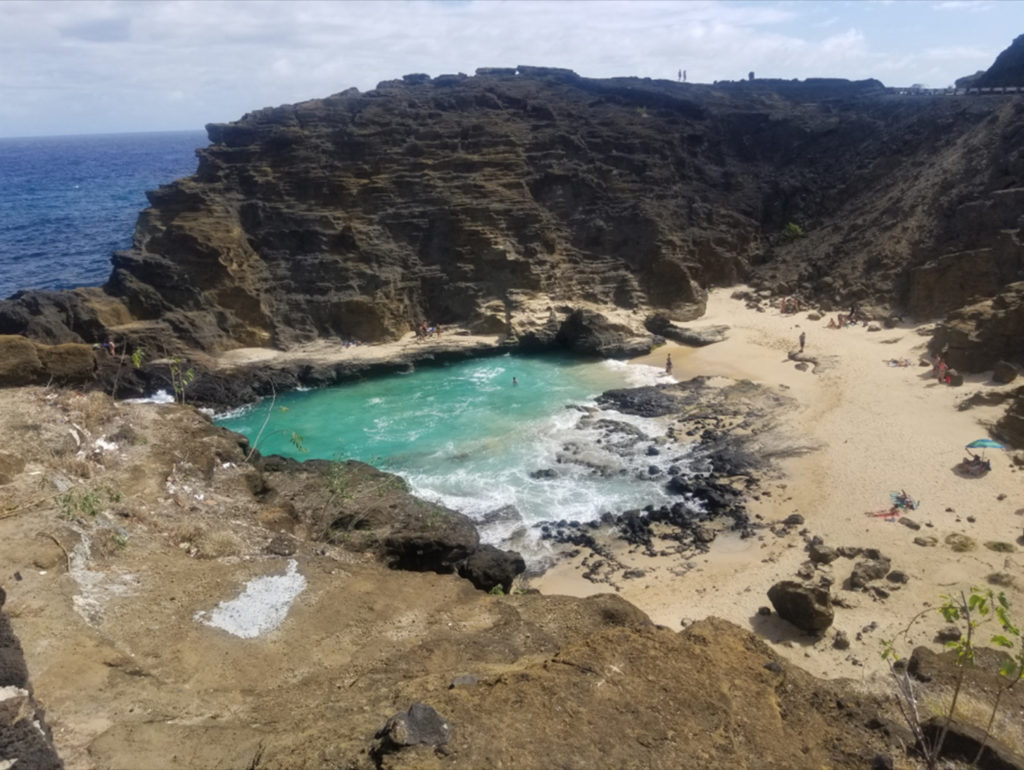
Here’s the original photo. Incredible view, but plenty of other people enjoying it as well. People silhouetted against the sky. People casting shadows on the sand and surf. People in front of both rock and sand.

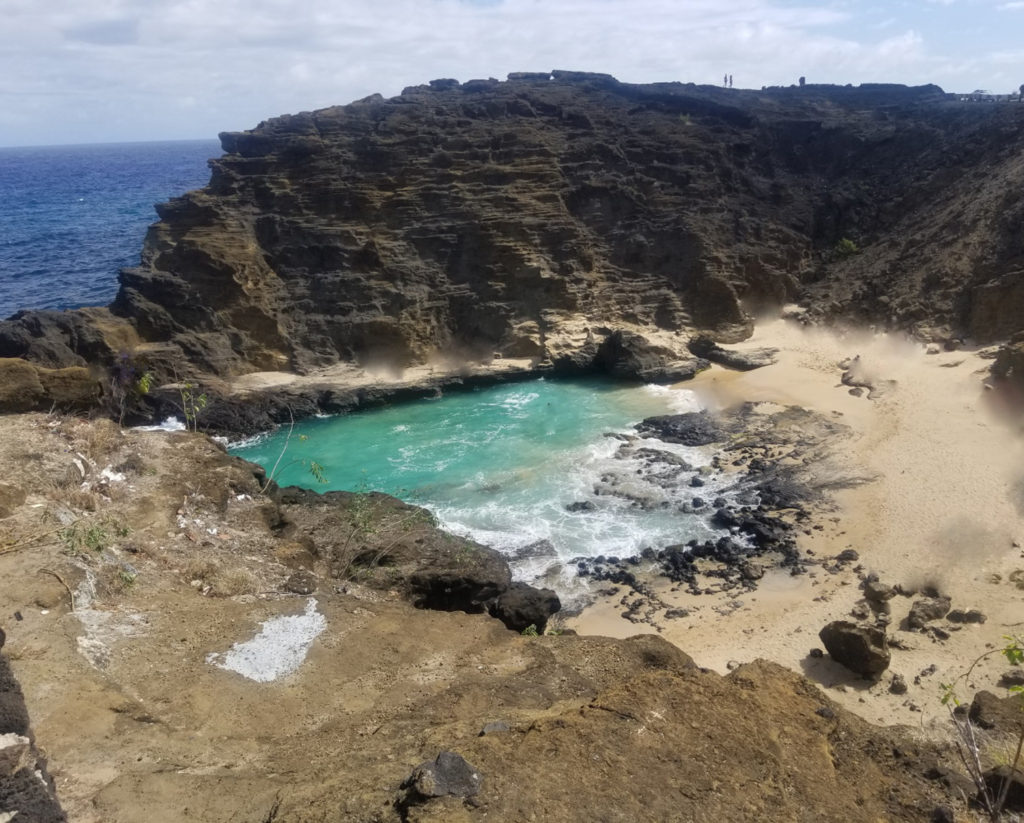
Here’s the photo edit from the app my brother used. As you can see, all that the app is able to do is blur areas where it identifies people and try to do what Photoshop calls “spot healing.” Because of this, all the hard lines between the rocks and the sand are lost, the hard edge of the surf is lost, and the entire area where the umbrella was set up is a shadow. The single person casting a shadow on the sand from the low rock is not completely removed, and the app did not even identify the people on top of the cliff. Not exactly ready to share.

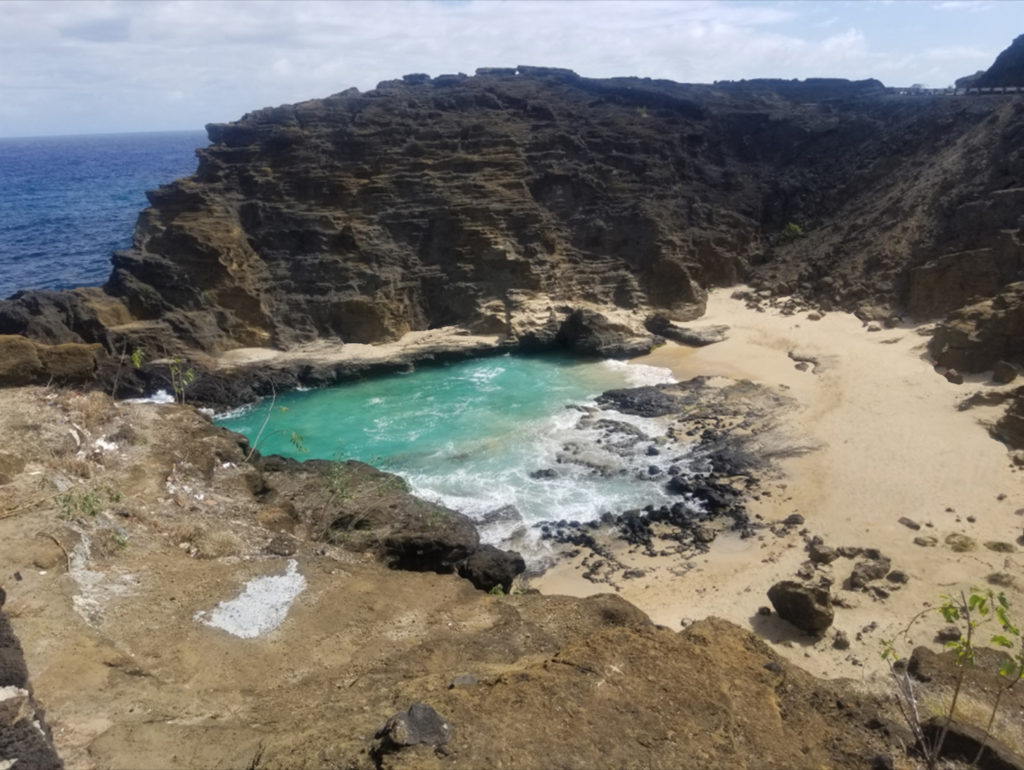
Now here is my photo edit done in Photoshop. It may as well be an abandoned cove! You’ll notice I was able to keep the sharp lines between rock and sand, completely eliminate the person on the low rock, along with their shadow, and maintain accurate shadows around all the rocks while removing the people. Footprints are smoothed, the silhouettes against the sky are gone, and everything is looking great!

Since a picture speaks a thousand words, you should have a pretty good idea about why using a real person to edit your photos is such a great idea! Here’s a quick summary though, if you are a list–lover like me!

  • Experience. I’m not just a formula . I’m a professional photo editor with ample experience editing photos.
  • Photoshop Skills. Unlike apps, I don’t resort to blurring everything out. I’m a Photoshop expert with a whole bag of tricks to make your photo look perfect!
  • Attention to detail. With that experience comes a well trained eye and steady hand. I catch the tiny details that make your photo edit believable and beautiful.
  • Excellent customer service. Why attempt to figure out an app and do it yourself when you can pass it on to me and get an amazing quality photo? I’m happy to answer questions, excellent communication throughout the process, and have quick turnaround time.

So make your photos into amazing memories; visit the shop here on my website or check us out on Etsy at Refined Photo Editing to see more samples of my work and purchase a service.

Tips For Getting Your BEST Head Swap Photo!

Tips For Getting Your BEST Head Swap Photo!

Getting Your BEST Head Swap Photo!

This article includes advice for choosing the perfect pictures to use for a head swap photo edit. I’ll be calling the main photo that you are building on to the “base photo” and any photos that are used to change people’s expressions the “add on photos”.

Benefits of Merging Faces or Head Swapping

The benefits of being able to trade heads and faces in your photos are numerous! They include . . .

how to pick the best pictures for a picture perfect head swap or face photo merge
  • Enjoying the moment! Knowing you can fix pictures later lets you be in the moment & enjoy making the memories, not trying to get a perfect picture (which we both know doesn’t happen anyway!)
  • Being less stressed! It makes the process of actually taking group pictures much less stressful because you know you can get them edited if needed.
  • No disappointment! Knowing you can get whatever you fixed takes away the disappointment of not having a satisfactory group photo!

You wouldn’t be here if you didn’t know all that already though. The better question is, “How do I pick the best pictures to head swap?”  Quick answer; you will need to take into account lighting, angle of the photo, and quality of the photo.

Maintaining similar lighting is important because shadows from different angles in the same photo or varying levels of shadows will make the edited image look “off” even if you can’t put your finger on the problem. For example, blending an add on picture of a person with harsh shadows across his face with a base photo that was taken with a flash and is a bit washed out will look wrong. I can adjust the lighting and correct shadows to some extent, but the more similar it looks, the better result you will get.

Using photos with similar angles  is essential.  The base photo and the add on photo needs to be taken from the same angle (both from above,  below,  straight-on etc.)  If the entire group is looking straight into the camera and you try to add on a picture of someone who is staring down at the camera, it is going to look wrong because you’ll be looking up the one person’s nose!

Quality is critical! I can’t work with what isn’t there.  It is so important to start with a good, high quality 300 dpi photos if it all possible.  It is very obvious when the base photo is a high quality photo and the add on photo is something small swiped off an instagram account or something similar.

Does color matter? Surprisingly color is not the most important thing to consider when finding photos that can be blended together. Yes, a black and white photo isn’t able to be blended into a color photo, but most often I am able to edit the color tone, exposure, etc to make the added photo match the base photo extremely well.

The Ideal Head Swap Set Up

                You might not be able to get a perfect photo with everyone looking, but you can definitely set yourself up for success when taking family or group photos. My best tip when taking group pictures to try to piece together an image where everyone is looking is to take a LOT of pictures at the same time. You will thank yourself once you sit back to check out your options for head swapping! To get the best results when switching heads or faces, provide pictures taken at the exact same time and place.  You will get the best results doing this because the lighting, angle of the faces, and angle of the camera will all be very similar.

To take the best pictures to build the perfect head swapped image, take 5-10 pictures of the same grouping back to back without moving the camera.

~ Alissa @ Refined Photo Editing

My family does this every time we want to get a decent group picture by taking at least 5-6 pictures back to back within a few seconds. We have a lot to work with and generally find that each person looks decent in at least one picture and I can blend them together when I edit them.

Learn more & purchase my head swap listing here! Please contact me or leave a comment below with any questions or additional tips! I’ll be adding to this list as needed to keep it current